
こんにちは、「MAKO」と言います。
今回の記事は、これまでで書いてきた以下のような記事の内容を組み合わせ、温湿度センサー(DHT11)から1秒周期で取得した温度と湿度をLCDディスプレイ(LCD1602)に表示するMicroPythonのプログラムを書いてみます。
📄![]() Raspberry Pi Picoに接続した温度・湿度センサーDHT11から情報を取得し表示(MicroPython)
Raspberry Pi Picoに接続した温度・湿度センサーDHT11から情報を取得し表示(MicroPython)
📄![]() Raspberry Pi Picoに接続したLCDディスプレイに文字列を表示(MicroPython)【LCD1602クラス公開】
Raspberry Pi Picoに接続したLCDディスプレイに文字列を表示(MicroPython)【LCD1602クラス公開】
電子回路は以下のように接続しています。
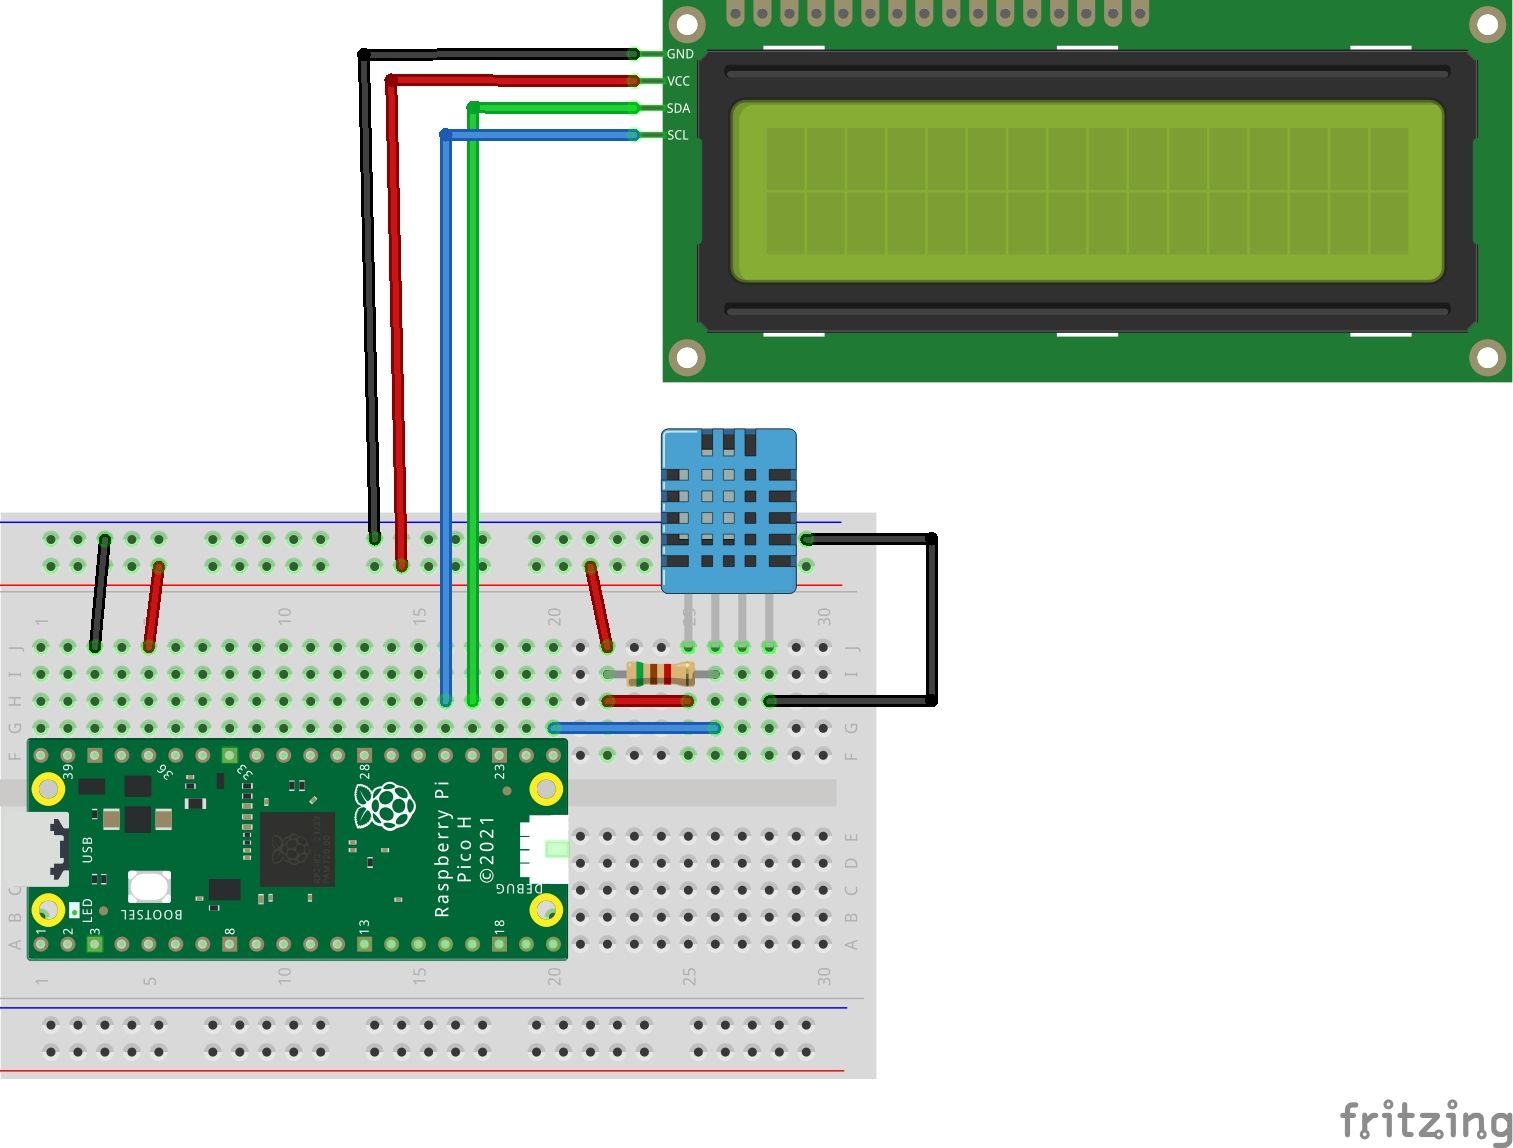
温湿度センサ(DHT11)のデータのPinは16番ピンに
LCDディスプレイ(LCD1602)のSDAとSCLのPinはそれぞれ18番、19番に設定しています。
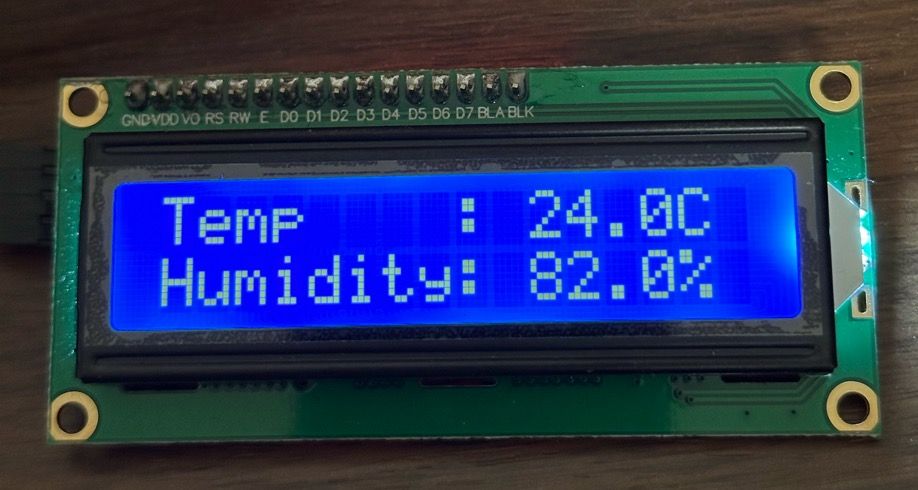
Raspberry Pi Pico Wについても、同じピン配置で接続すればそのまま使用できることを確認しています。
※Raspberry Pi Pico Wにおける動作画像
今回の記事にあたって、先日の記事である
📄![]() Raspberry Pi Picoに接続したLCDディスプレイに文字列を表示(MicroPython)【LCD1602クラス公開】
Raspberry Pi Picoに接続したLCDディスプレイに文字列を表示(MicroPython)【LCD1602クラス公開】
にて作成したLCD1602のライブラリに文字列の表示開始位置の行と桁を指定して表示する以下のAPIを追加しました。
■ lib/lcd1602.py
    def print_pos(self, row, col, str) -> None:
        """print_pos

        Args:
            row (_type_): display row position
            col (_type_): display col position
            str (_type_): display string
        """
        if((row != 1) and (row != 2)):
            print("row is invalid.")
            return

        if((col == 0) or (col > 16)):
            print("col is invalid.")
            return

        if(((col - 1) + len(str)) > 16):
            print("str length over size.")
            return

        self.cursor_pos_set(row, col)

        for index in range(len(str)):
            self.write_char(str[index])
そして、温湿度を取得し、LCDディスプレイに表示するサンプルプロラムは以下の通り作成しました。
■ test_lcd1602_dht11.py
import dht
import time
from machine import Pin
from lib import LCD1602
# DHT11
DHT11_PIN_NO = 16
# LCD1602
LCD1602_IF_NO = 1
LCD1602_SDA_PIN_NO = 18
LCD1602_SCL_PIN_NO = 19
if __name__ == "__main__":
# LCD1602 インスタンス生成(Interface=1, SDA=Pin(18), SCL=Pin(19))
lcd1602 = LCD1602(LCD1602_IF_NO, LCD1602_SDA_PIN_NO, LCD1602_SCL_PIN_NO)
## LCD1602 初期化
# Display Off
lcd1602.display_enable(False)
# Display Clear
lcd1602.display_clear()
# Cursor Right move, Data Shit OFF
lcd1602.entry_mode_set(1,0)
# Display ON, Corsor OFF, Blink Off
lcd1602.display_enable(True)
# Display Clear
lcd1602.display_clear()
# Display Set "Temperature:" to Line 1
lcd1602.print_line(1,"Temp :")
# Display Set "Humidity :" to Line 1
lcd1602.print_line(2,"Humidity:")
dht_sensor = dht.DHT11(Pin(DHT11_PIN_NO))
while True:
try:
# 測定を行う
dht_sensor.measure()
# 温度と湿度を取得
temperature_celsius = dht_sensor.temperature()
humidity_percentage = dht_sensor.humidity()
# 結果文字列更新
lcd1602.print_pos(1, 11, "{:.1f}C".format(temperature_celsius))
lcd1602.print_pos(2, 11, "{:.1f}%".format(humidity_percentage))
# 1秒待機
time.sleep(1)
except Exception as e:
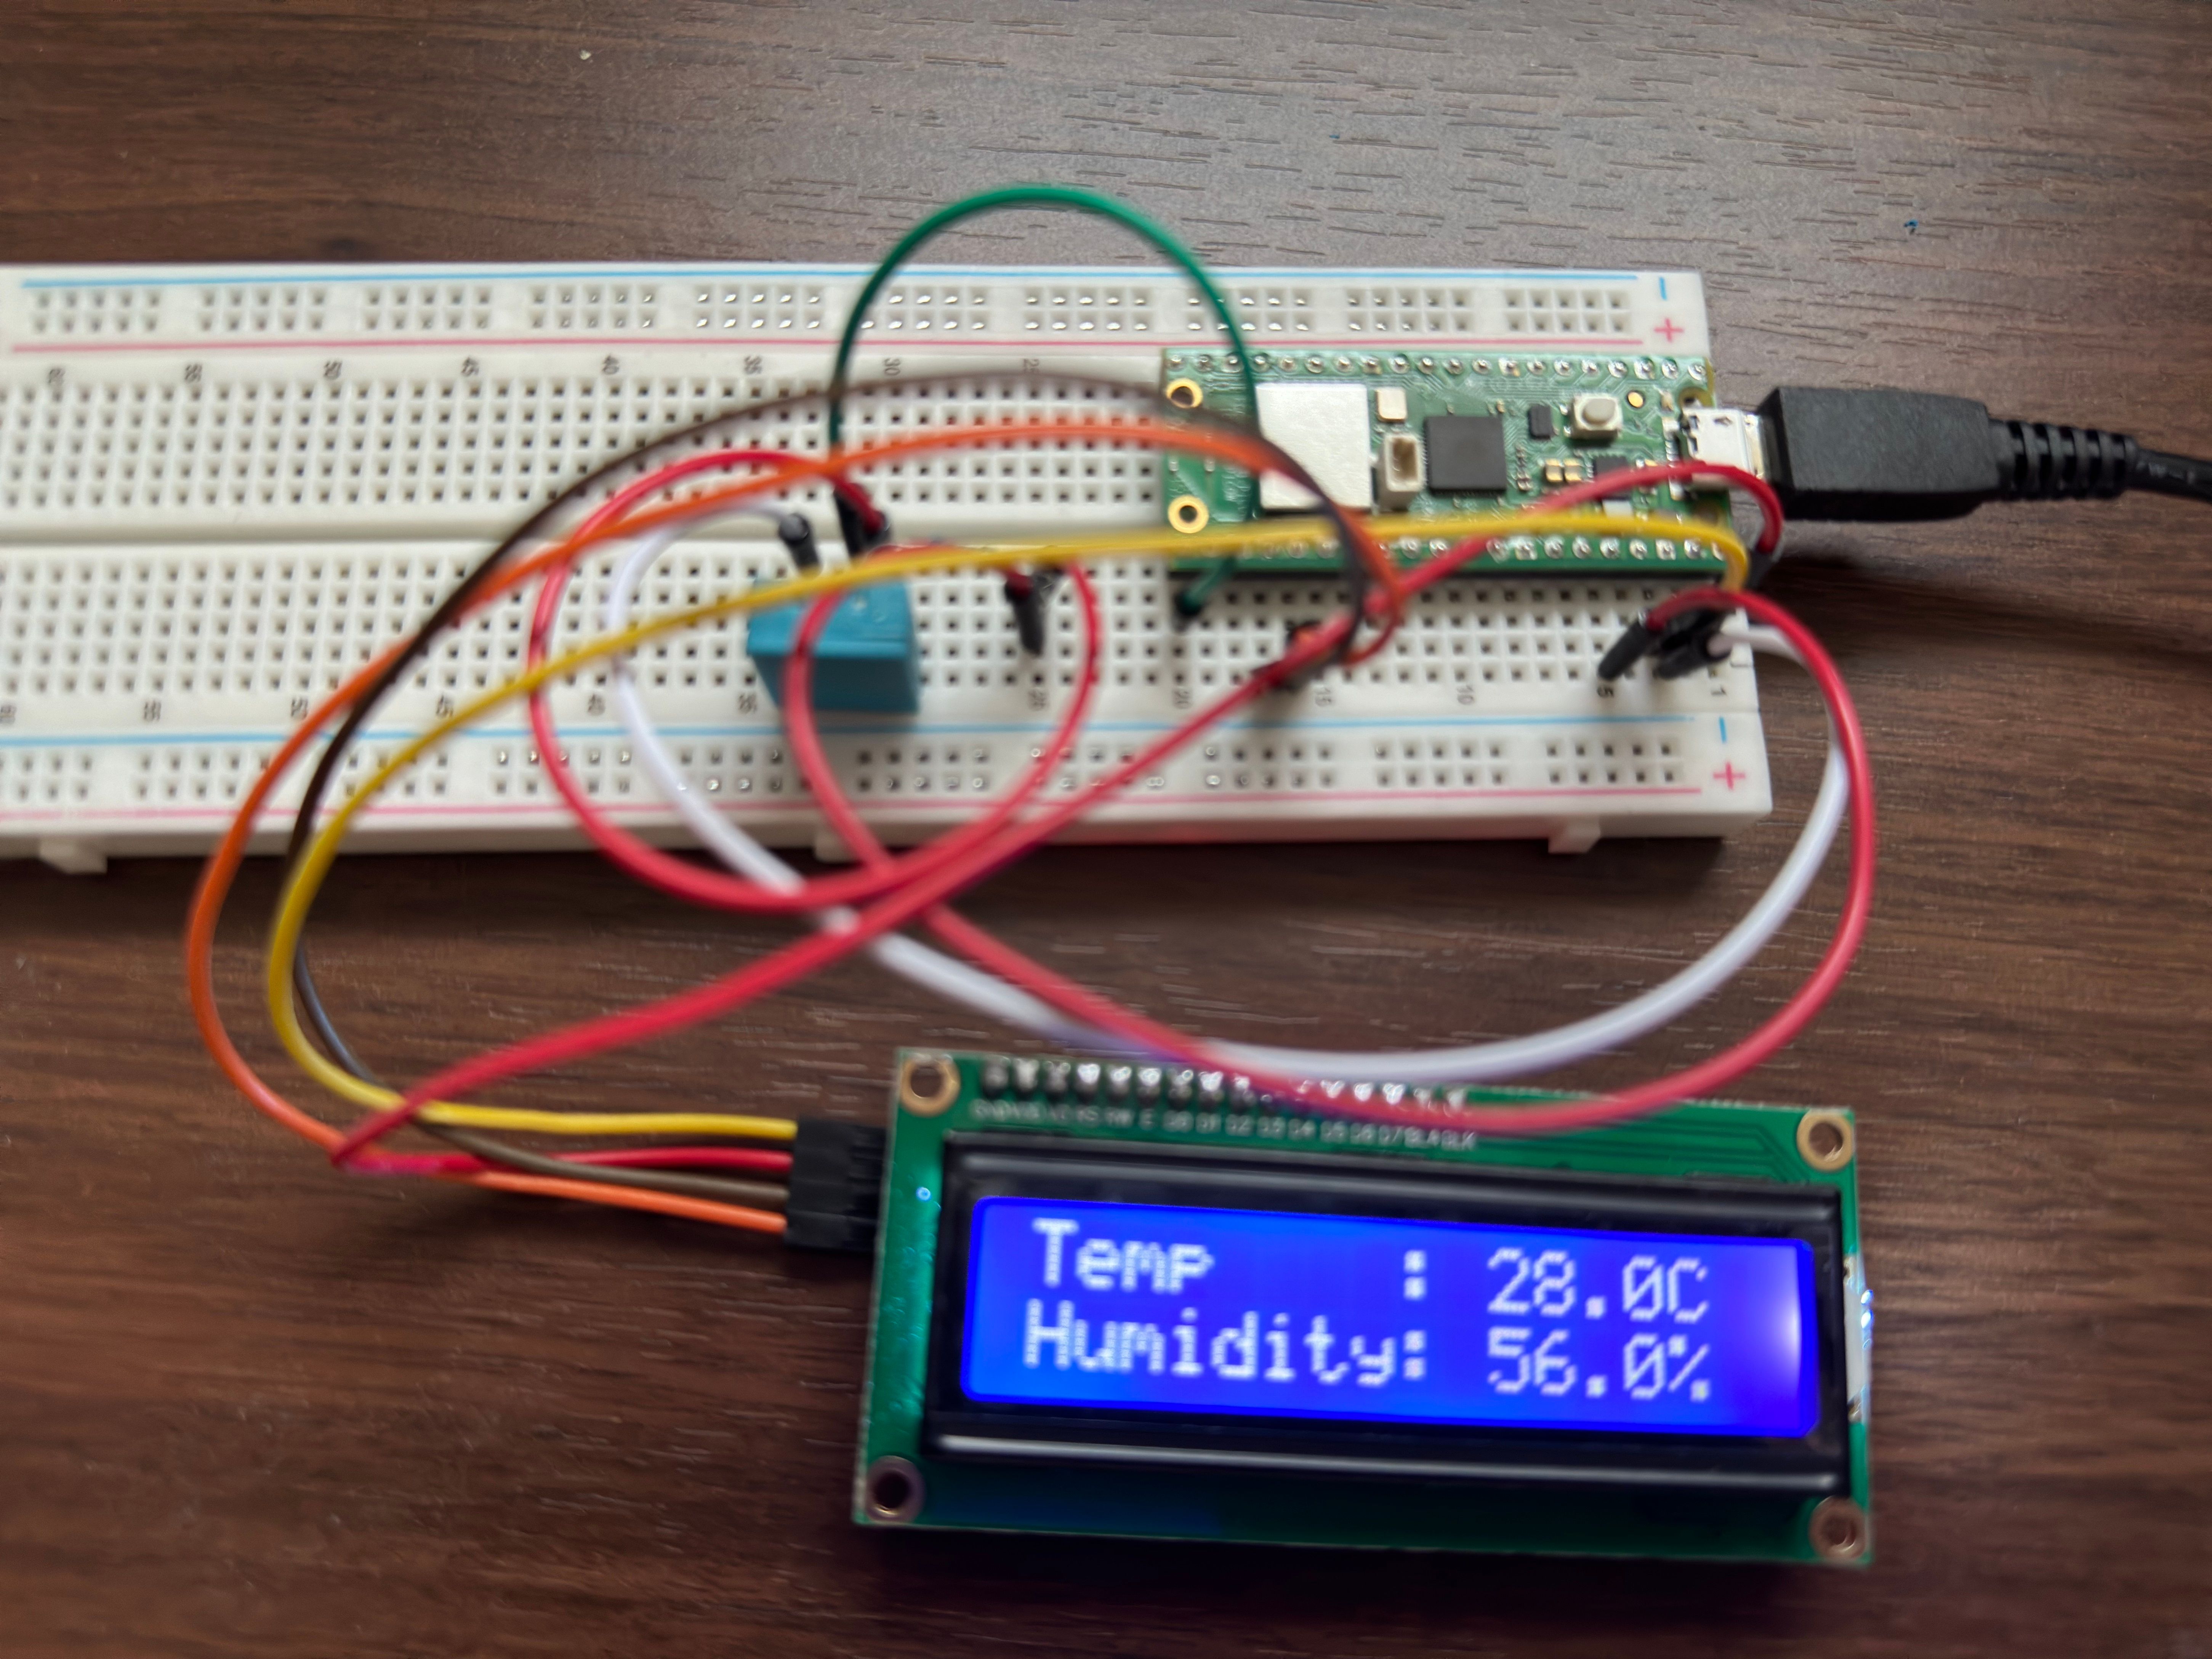
print("エラー:", e)この更新したライブラリとサンプルプログラムをRaspberry Pi Picoにて実行した結果、以下の通りLCDディスプレイに温度と湿度が表示されました。
温度、および湿度が変化すると1秒間隔で表示が更新されます。
※以下は、Raspberry Pi Picoにて動作確認を行った際の画像です。
更新したライブラリとサンプルプログラムのソースについてはGitHubにて公開していますので、参考にしていただければ幸いです。